

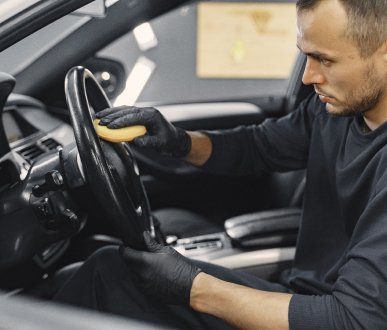
A professional interior car detailing job follows a fixed order: remove clutter and floor mats, dry-vacuum and blow out debris, clean from the top down (headliner, dashboard, vents, doors), deep clean seats and carpets with shampoo or steam, treat leather and plastics, clean glass last, and finish with odour removal and a final inspection. Working top to bottom and dry before wet stops dirt from falling onto surfaces you have already cleaned and gives a showroom-quality result.
In a city like Lahore, where dust, heat, smog and long commutes take a daily toll, a car’s interior gets dirty far faster than most owners realise. At Umer Auto, our car detailing service follows a proven step-by-step process. This checklist shows you exactly what professionals do, so you can detail your own car properly or know what to expect from a detailing shop.
Tools and Products You Need for Interior Detailing
Before you start, gather the right equipment. Professionals use a wet-and-dry vacuum with crevice and brush attachments, an air blower or compressor, soft detailing brushes of different sizes, microfibre towels, an all-purpose interior cleaner, a fabric and carpet shampoo, a leather cleaner and conditioner, a non-greasy plastic and vinyl protectant, an ammonia-free glass cleaner, and a steam cleaner or carpet extractor for deep cleaning. Choose low-odour products where possible, as many cleaning chemicals release volatile compounds that can irritate in an enclosed cabin, as explained by the US EPA’s guidance on VOCs and indoor air quality.
The 15-Step Interior Car Detailing Checklist
Step 1: Inspect the Interior and Note Problem Areas
Professionals always start with a walk-around inspection. Check for stains, spills, pet hair, torn upholstery, sticky surfaces, mould, and strong odours. Taking photos helps track before-and-after results and highlights areas that need special treatment. If you notice damaged or worn seat fabric, it may be time to consider new car seat covers rather than cleaning alone.
Step 2: Remove Trash, Personal Items and Floor Mats
Clear everything out of the car, including the glovebox, door pockets, cup holders, seat-back pockets and boot. Remove all floor mats so they can be cleaned separately and so you can reach the carpet underneath. An empty cabin makes every following step faster and more thorough.
Step 3: Blow Out Dust From Tight Spaces
Use compressed air or an air blower to push dust and debris out of air vents, seat rails, gaps around the gear lever, the centre console and the seams of seats. In Lahore’s dusty conditions, a surprising amount of fine dirt collects in these areas. Blowing it out first means the vacuum can pick it up in the next step instead of it settling on clean surfaces later.
Step 4: Dry Vacuum the Entire Cabin
Vacuum from top to bottom, starting with the headliner and seats and finishing with the carpets. Use a crevice tool for gaps and a brush attachment to agitate carpet fibres and lift embedded dirt. Slide the front seats fully forward and back to reach underneath them. Thorough dry vacuuming removes most loose dirt before any liquid touches the interior, which prevents mud from forming in the carpet.
Step 5: Clean and Treat the Floor Mats
Rubber mats can be scrubbed with an all-purpose cleaner, rinsed and dried in the shade. Carpet mats should be vacuumed, shampooed, agitated with a stiff brush and extracted or rinsed, then dried completely before going back in the car. Damp mats are a common cause of musty smells.
Step 6: Clean the Headliner Gently
The headliner is the fabric on the roof of the cabin, and it is held up with adhesive that can loosen if it gets too wet. Professionals spray a small amount of cleaner onto a microfibre towel, not directly onto the headliner, and blot rather than scrub. This removes marks and smoke residue without causing sagging.
Step 7: Detail the Dashboard and Instrument Panel
Spray interior cleaner onto a microfibre towel and wipe the dashboard, steering column and instrument cluster. Use a soft brush around buttons, seams and textured areas. Avoid spraying liquid directly onto screens, switches and electronics. If moisture does get into controls and something stops working, a check by our car electrical repairs team can prevent bigger problems.
Step 8: Clean Air Vents and the Centre Console
Use thin detailing brushes or foam swabs to clean inside each vent slat. Then clean the centre console, gear lever surround, cup holders and storage compartments. Cup holders often hold sticky residue from drinks, which may need an all-purpose cleaner and a few minutes to soften before wiping.
Step 9: Clean the Steering Wheel, Gear Knob and High-Touch Areas
The steering wheel, gear knob, handbrake, door handles, window switches and seat belt buckles are the most frequently touched parts of the car. They collect sweat, oils and germs. Clean them thoroughly with an appropriate cleaner and finish with a dry microfibre towel so the surfaces are not slippery.
Step 10: Clean Door Panels and Door Jambs
Wipe the door cards, armrests, pockets and speaker grilles. Then open each door and clean the door jambs, the painted area visible only when the door is open. Jambs collect dirt that transfers onto clothes when getting in and out, and a clean jamb is one of the clearest signs of a professional job.
Step 11: Deep Clean Fabric Seats and Carpets
This is where the biggest transformation happens. Pre-treat stains, then apply fabric shampoo, agitate with a brush to break up dirt, and extract it with a wet vacuum or carpet extractor. Steam cleaning is especially effective because it lifts grime, loosens stubborn stains and helps sanitise without soaking the fabric. Always allow seats and carpets to dry fully with the windows slightly open or the air conditioning running to prevent mould and odours.
Step 12: Clean and Condition Leather Seats
Leather needs a different approach from fabric. Use a dedicated leather cleaner with a soft brush to lift dirt from the grain and seams, then wipe clean. Follow with a quality leather conditioner to replace lost oils and help prevent cracking, which is a real risk in Lahore’s summer heat when cars are parked in direct sun. Avoid harsh all-purpose cleaners on leather, as they can dry it out and fade the colour.
Step 13: Protect Plastic, Vinyl and Rubber Surfaces
After cleaning, apply a non-greasy, UV-protective dressing to the dashboard, door panels and trim. This helps prevent fading and cracking caused by sun exposure. Professionals choose a matte or satin finish rather than a high-gloss shine, because glossy dashboards cause glare on the windscreen and attract more dust.
Step 14: Clean the Windows, Mirrors and Screens
Glass is cleaned last so no other product overspray lands on it afterwards. Use an ammonia-free glass cleaner, especially if your windows are tinted, and two microfibre towels, one to clean and one to buff dry. Clean the inside of the windscreen with the back of your hand on the towel to reach the lower corners. Use a screen-safe cleaner on infotainment displays. For a full finish inside and out, pair interior detailing with a professional car wash.
Step 15: Remove Odours and Do a Final Inspection
Finally, tackle any remaining smells. Professionals remove the source of the odour rather than covering it, using enzyme cleaners for organic spills, steam treatment, or ozone treatment for heavy smoke and mould smells. Checking and replacing a dirty cabin air filter also makes a big difference, as it traps dust and pollen entering through the air conditioning. This is often included in a general car service. Refit the floor mats, then do a final walk-around inspection in good light to catch any missed spots.
Quick Interior Car Detailing Checklist
For easy reference, here is the full sequence professionals follow: inspect the interior, remove trash and floor mats, blow out dust from tight spaces, dry vacuum the cabin, clean the floor mats, clean the headliner, detail the dashboard, clean the vents and console, clean high-touch areas, clean door panels and jambs, deep clean fabric seats and carpets, clean and condition leather, protect plastics and vinyl, clean the glass and screens, and finish with odour removal and a final inspection.
How Often Should You Detail Your Car Interior?
Most cars benefit from a full professional interior detail every three to four months, with a quick vacuum and wipe-down every one to two weeks. In Lahore, cars used for daily commuting, school runs, ride-hailing, or families with children and pets may need detailing more often because of dust, heat and frequent use. A detail is also worth booking before selling a car, after a long trip, or after the monsoon season when damp conditions can cause musty smells. If you are planning a long drive, our guide on how to prepare your car for a Northern Areas road trip covers what to check before you go.
DIY Interior Detailing vs Professional Detailing
You can follow this checklist at home with the right products and a few hours of time. However, professional detailers use commercial-grade extractors, steam machines, ozone generators and specialised chemicals that deliver deeper results, especially on heavy stains, smoke smells and neglected interiors. Professionals also know which products are safe for different materials, which avoids costly damage to leather, headliners and electronics.
If you also want the outside of your car looking its best, our compound polishing service restores paint shine and removes light scratches. You can learn more about protecting your paint in our article on compound polishing vs ceramic coating.
Why Choose Umer Auto for Car Detailing in Lahore?
Umer Auto has served Lahore’s drivers with car repair, denting, painting and detailing services for years. Our detailing team follows the same structured process outlined in this checklist, using professional equipment and material-safe products for every vehicle, from small hatchbacks to SUVs. We serve customers across the city, including Johar Town, Gulberg, Defence and Bahria Town. You can see the full list on our areas we serve page, or read our tips on how to choose a reliable car workshop in Lahore.
Frequently Asked Questions
What is the correct order for interior car detailing?
The correct order is to remove clutter and mats, blow out and vacuum the cabin, clean from the top down starting with the headliner and dashboard, deep clean seats and carpets, treat leather and plastics, clean the glass last, and finish with odour removal and a final inspection.
How long does professional interior car detailing take?
A professional interior detail usually takes between two and five hours, depending on the size of the car, its condition, and whether deep cleaning services like steam cleaning, shampooing or odour treatment are needed.
Is steam cleaning safe for car interiors?
Yes, steam cleaning is safe for most fabric seats, carpets and hard surfaces when done correctly. It lifts dirt and helps sanitise without soaking the material. It should be used carefully around electronics and on delicate surfaces like headliners.
How do I remove bad smells from my car interior?
Remove the source of the smell first by cleaning spills, mats and upholstery. Then use enzyme cleaners for organic odours, replace the cabin air filter, and consider professional ozone treatment for smoke or mould smells.
Can I use household cleaners on my car interior?
It is best to avoid them. Many household cleaners are too harsh for car materials and can fade plastics, dry out leather, or damage tinted windows. Use products designed specifically for car interiors.
How often should I condition leather car seats?
Leather seats should be cleaned and conditioned every two to three months. In hot climates like Lahore, more frequent conditioning helps prevent drying and cracking.
Final Thoughts
A clean car interior is about more than appearance. It improves air quality, protects your seats and trim from sun damage, and makes every drive more comfortable. Following these 15 steps in the right order is the secret to the results professionals achieve.
If you would rather leave it to the experts, contact Umer Auto today to book professional interior car detailing in Lahore. You can also browse more car care tips on our blog or check our FAQs.